Yocto Project Quick Start
Copyright © 2010-2015 Linux Foundation
Permission is granted to copy, distribute and/or modify this document under the terms of the Creative Commons Attribution-Share Alike 2.0 UK: England & Wales as published by Creative Commons.
Note
For the latest version of this manual associated with this Yocto Project release, see the Yocto Project Quick Start from the Yocto Project website.Welcome!
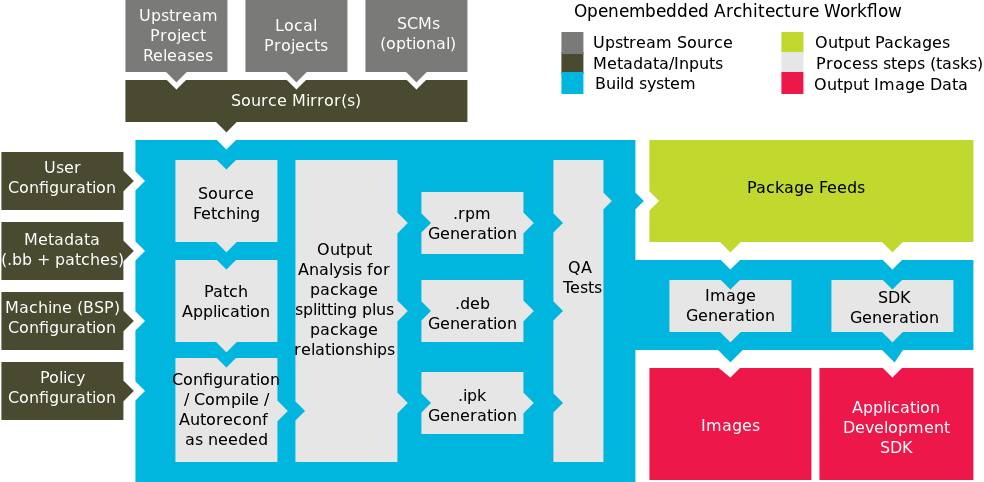
Welcome to the Yocto Project! The Yocto Project is an open-source collaboration project focused on embedded Linux developers. Among other things, the Yocto Project uses a build system based on the OpenEmbedded (OE) project, which uses the BitBake tool, to construct complete Linux images. The BitBake and OE components are combined together to form Poky, a reference build system.
If you don't have a system that runs Linux and you want to give the Yocto Project a test run, you might consider using the Yocto Project Build Appliance. The Build Appliance allows you to build and boot a custom embedded Linux image with the Yocto Project using a non-Linux development system. See the Yocto Project Build Appliance for more information.
On the other hand, if you know all about open-source development, Linux development environments, Git source repositories and the like and you just want some quick information that lets you try out the Yocto Project on your Linux system, skip right to the "Super User" section at the end of this quick start.
For the rest of you, this short document will give you some basic information about the environment and let you experience it in its simplest form. After reading this document, you will have a basic understanding of what the Yocto Project is and how to use some of its core components. This document steps you through a simple example showing you how to build a small image and run it using the Quick EMUlator (QEMU emulator).
For more detailed information on the Yocto Project, you should check out these resources:
Website: The Yocto Project Website provides the latest builds, breaking news, full development documentation, and a rich Yocto Project Development Community into which you can tap.
FAQs: Lists commonly asked Yocto Project questions and answers. You can find two FAQs: Yocto Project FAQ on a wiki, and the "FAQ" chapter in the Yocto Project Reference Manual.
Developer Screencast: The Getting Started with the Yocto Project - New Developer Screencast Tutorial provides a 30-minute video created for users unfamiliar with the Yocto Project but familiar with Linux build systems. While this screencast is somewhat dated, the introductory and fundamental concepts are useful for the beginner.
Introducing the Yocto Project Development Environment
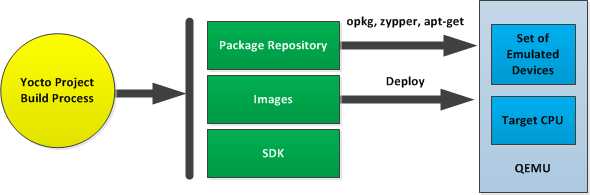
The Yocto Project through the OpenEmbedded build system provides an open source development environment targeting the ARM, MIPS, PowerPC and x86 architectures for a variety of platforms including x86-64 and emulated ones. You can use components from the Yocto Project to design, develop, build, debug, simulate, and test the complete software stack using Linux, the X Window System, GTK+ frameworks, and Qt frameworks.
 |
The Yocto Project Development Environment
Here are some highlights for the Yocto Project:
Provides a recent Linux kernel along with a set of system commands and libraries suitable for the embedded environment.
Makes available system components such as X11, GTK+, Qt, Clutter, and SDL (among others) so you can create a rich user experience on devices that have display hardware. For devices that do not have a display or where you wish to use alternative UI frameworks, these components need not be installed.
Creates a focused and stable core compatible with the OpenEmbedded project with which you can easily and reliably build and develop.
Fully supports a wide range of hardware and device emulation through the QEMU Emulator.
The Yocto Project can generate images for many kinds of devices. However, the standard example machines target QEMU full-system emulation for x86, x86-64, ARM, MIPS, and PPC-based architectures as well as specific hardware such as the Intel® Desktop Board DH55TC. Because an image developed with the Yocto Project can boot inside a QEMU emulator, the development environment works nicely as a test platform for developing embedded software.
Another important Yocto Project feature is the Sato reference User Interface. This optional UI that is based on GTK+ is intended for devices with restricted screen sizes. The UI sits neatly on top of a device using the GTK+ stack and provides a well-defined user experience. Implemented in its own layer, it makes it clear to developers how they can implement their own user interface on top of a Linux image created with the Yocto Project.
What You Need and How You Get It
You need these things to develop projects in the Yocto Project environment:
A host system with a minimum of 50 Gbytes of free disk space that is running a supported Linux distribution (i.e. recent releases of Fedora, openSUSE, CentOS, Debian, or Ubuntu). If the host system supports multiple cores and threads, you can configure the Yocto Project build system to significantly decrease the time needed to build images.
Appropriate packages installed on the system you are using for builds.
A release of the Yocto Project.
The Linux Distribution
The Yocto Project team is continually verifying more and more Linux distributions with each release. In general, if you have the current release minus one of the following distributions you should have no problems.
Ubuntu
Fedora
openSUSE
CentOS
Debian
For a more detailed list of distributions that support the Yocto Project, see the "Supported Linux Distributions" section in the Yocto Project Reference Manual.
The OpenEmbedded build system should be able to run on any modern distribution that has the following versions for Git, tar, and Python.
Git 1.7.8 or greater
tar 1.24 or greater
Python 2.7.3 or greater excluding Python 3.x, which is not supported.
Earlier releases of Python are known to not work and the system does not support Python 3 at this time. If your system does not meet any of these three listed version requirements, you can take steps to prepare the system so that you can still use the build system. See the "Required Git, tar, and Python Versions" section in the Yocto Project Reference Manual for information.
This document assumes you are running one of the previously noted distributions on your Linux-based host systems.
Note
If you attempt to use a distribution not in the above list, you may or may not have success. Yocto Project releases are tested against the stable Linux distributions listed in the "Supported Linux Distributions" section of the Yocto Project Reference Manual. If you encounter problems, please go to Yocto Project Bugzilla and submit a bug. We are interested in hearing about your experience.
The Packages
Packages and package installation vary depending on your development system and on your intent. For example, if you want to build an image that can run on QEMU in graphical mode (a minimal, basic build requirement), then the number of packages is different than if you want to build an image on a headless system or build out the Yocto Project documentation set. Collectively, the number of required packages is large if you want to be able to cover all cases.
Note
In general, you need to have root access and then install the required packages. Thus, the commands in the following section may or may not work depending on whether or not your Linux distribution hassudo installed.
The next few sections list, by supported Linux Distributions, the required packages needed to build an image that runs on QEMU in graphical mode (e.g. essential plus graphics support).
For lists of required packages for other scenarios, see the "Required Packages for the Host Development System" section in the Yocto Project Reference Manual.
Ubuntu and Debian
The essential and graphical support packages you need for a supported Ubuntu or Debian distribution are shown in the following command:
     $ sudo apt-get install gawk wget git-core diffstat unzip texinfo gcc-multilib \
     build-essential chrpath socat libsdl1.2-dev xterm
Note
If your build system has theoss4-dev package installed, you
might experience QEMU build failures due to the package
installing its own custom
/usr/include/linux/soundcard.h on
the Debian system.
If you run into this situation, either of the following
solutions exist:
     $ sudo apt-get build-dep qemu
     $ sudo apt-get remove oss4-dev
Fedora
The essential and graphical packages you need for a supported Fedora distribution are shown in the following command:
     $ sudo yum install gawk make wget tar bzip2 gzip python unzip perl patch \
     diffutils diffstat git cpp gcc gcc-c++ glibc-devel texinfo chrpath \
     ccache perl-Data-Dumper perl-Text-ParseWords perl-Thread-Queue socat \
     findutils which SDL-devel xterm
OpenSUSE
The essential and graphical packages you need for a supported OpenSUSE distribution are shown in the following command:
     $ sudo zypper install python gcc gcc-c++ git chrpath make wget python-xml \
     diffstat makeinfo python-curses patch socat libSDL-devel xterm
CentOS
The essential and graphical packages you need for a supported CentOS distribution are shown in the following command:
     $ sudo yum install gawk make wget tar bzip2 gzip python unzip perl patch \
     diffutils diffstat git cpp gcc gcc-c++ glibc-devel texinfo chrpath socat SDL-devel xterm
Note
Depending on the CentOS version you are using, other requirements and dependencies might exist. For details, you should look at the CentOS sections on the Poky/GettingStarted/Dependencies wiki page.
Yocto Project Release
It is recommended that you get the latest Yocto Project files
by setting up (cloning in
Git terms) a local
copy of the
poky Git repository on your host development
system.
Doing so allows you to contribute back to the Yocto Project project.
For information on how to get set up using this method, see the
"Yocto
Project Release" item in the Yocto Project Development Manual.
You can also get the Yocto Project Files by downloading Yocto Project releases from the Yocto Project website. From the website, you just click "Downloads" in the navigation pane to the left to display all Yocto Project downloads. Current and archived releases are available for download. Nightly and developmental builds are also maintained at http://autobuilder.yoctoproject.org/pub/nightly/. One final site you can visit for information on Yocto Project releases is the Releases wiki. However, for this document a released version of Yocto Project is used.
A Quick Test Run
Now that you have your system requirements in order, you can give the Yocto Project a try. This section presents some steps that let you do the following:
Build an image and run it in the QEMU emulator.
Use a pre-built image and run it in the QEMU emulator.
Note
This section does not provide detail, but rather provides minimal, working commands and examples designed to just get you started. For more details, see the appropriate manuals in the Yocto Project manual set.
Building an Image
In the development environment you will need to build an image whenever you change hardware support, add or change system libraries, or add or change services that have dependencies.
Building an Image
Use the following commands to build your image. The OpenEmbedded build process creates an entire Linux distribution, including the toolchain, from source.
Note about Network Proxies
By default, the build process searches for source code using a pre-determined order through a set of locations. If you are working behind a firewall and your build system is not set up for proxies, you could encounter problems with the build process when fetching source code (e.g. fetcher failures or Git failures).
If you do not know your proxy settings, consult your local network infrastructure resources and get that information. A good starting point could also be to check your web browser settings. Finally, you can find more information on using the Yocto Project behind a firewall in the Yocto Project Reference Manual FAQ and on the "Working Behind a Network Proxy" wiki page.
     $ git clone http://git.yoctoproject.org/git/poky
     $ cd poky
     $ git checkout -b fido origin/fido
     $ source oe-init-build-env
Tip
To help conserve disk space during builds, you can add the
following statement to your project's configuration file,
which for this example is
poky/build/conf/local.conf.
Adding this statement deletes the work directory used for
building a package once the package is built.
INHERIT += "rm_work"
In the previous example, the first command uses Git to create a local repository named
pokythat is a clone of the upstream Yocto Projectpokyrepository.The third command checks out the current Yocto Project release into a local branch whose name matches the release (i.e.
fido). The local branch tracks the upstream branch of the same name. Creating your own branch based on the released branch ensures you are using the latest files for that release.The final command runs the Yocto Project
oe-init-build-envenvironment setup script. Running this script defines OpenEmbedded build environment settings needed to complete the build. The script also creates the Build Directory, which isbuildin this case and is located in the Source Directory. After the script runs, your current working directory is set to the Build Directory. Later, when the build completes, the Build Directory contains all the files created during the build.Note
For information on running a memory-resident BitBake, see theoe-init-build-env-memressetup script.
Take some time to examine your local.conf file
in your project's configuration directory, which is found in the Build Directory.
The defaults in that file should work fine.
However, there are some variables of interest at which you might look.
By default, the target architecture for the build is qemux86,
which produces an image that can be used in the QEMU emulator and is targeted at an
Intel® 32-bit based architecture.
To change this default, edit the value of the
MACHINE
variable in the configuration file before launching the build.
Three other variables of interest are the
BB_NUMBER_THREADS,
PARALLEL_MAKE,
and
BB_NUMBER_PARSE_THREADS
variables.
By default, the OpenEmbedded build system sets these variables
based on the number of processor cores your build host uses.
Thus, you typically do not need to uncomment these variables in
your local.conf file to gain optimal build
times.
Another consideration before you build is the package manager used when creating
the image.
By default, the OpenEmbedded build system uses the RPM package manager.
You can control this configuration by using the
PACKAGE_CLASSESpackage*.bbclass"
section in the Yocto Project Reference Manual.
Continue with the following command to build an OS image for the
target, which is core-image-sato in this
example.
For information on the -k option use the
bitbake --help command, see the
"BitBake"
section in the Yocto Project Reference Manual, or see the
"BitBake Command"
section in the BitBake User Manual.
For information on other targets, see the
"Images"
chapter in the Yocto Project Reference Manual.
$ bitbake -k core-image-sato
Note
BitBake requires Python 2.7. For more information on this requirement, see the "Required Git, tar, and Python" section in the Yocto Project Reference Manual.The final command runs the image using the QEMU emulator:
$ runqemu qemux86
Note
Depending on the number of processors and cores, the amount of RAM, the speed of your Internet connection and other factors, the build process could take several hours the first time you run it. Subsequent builds run much faster since parts of the build are cached.
If you want to learn more about running QEMU, see the "Using the Quick EMUlator (QEMU)" chapter in the Yocto Project Development Manual.
For information on how to use a pre-built binary, continue reading into the next section. Otherwise, you might be interested in reading the early chapters of the Yocto Project Development Manual.
Using Pre-Built Binaries and QEMU
If hardware, libraries and services are stable, you can get started by using a pre-built binary of the filesystem image, kernel, and toolchain and run it using the QEMU emulator. This scenario is useful for developing application software.
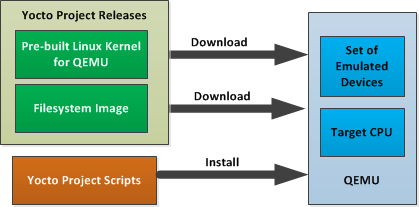
Using a Pre-Built Image
For this scenario, you need to do several things:
Install the appropriate stand-alone toolchain tarball.
Download the pre-built image that will boot with QEMU. You need to be sure to get the QEMU image that matches your target machine’s architecture (e.g. x86, ARM, etc.).
Download the filesystem image for your target machine's architecture.
Set up the environment to emulate the hardware and then start the QEMU emulator.
Installing the Toolchain
You can download a tarball installer, which includes the
pre-built toolchain, the runqemu
script, and support files from the appropriate directory under
http://downloads.yoctoproject.org/releases/yocto/yocto-1.8/toolchain/.
Toolchains are available for 32-bit and 64-bit x86 development
systems from the i686 and
x86_64 directories, respectively.
The toolchains the Yocto Project provides are based off the
core-image-sato image and contain
libraries appropriate for developing against that image.
Each type of development system supports five or more target
architectures.
The names of the tarball installer scripts are such that a string representing the host system appears first in the filename and then is immediately followed by a string representing the target architecture.
     poky-glibc-host_system-image_type-arch-toolchain-release_version.sh

     Where:
         host_system is a string representing your development system:

                    i686 or x86_64.

         image_type is a string representing the image you wish to
                develop a Software Development Toolkit (SDK) for use against.
                The Yocto Project builds toolchain installers using the
                following BitBake command:

                    bitbake core-image-sato -c populate_sdk

         arch is a string representing the tuned target architecture:

                    i586, x86_64, powerpc, mips, armv7a or armv5te

         release_version is a string representing the release number of the
                Yocto Project:

                    1.8, 1.8+snapshot
For example, the following toolchain installer is for a 64-bit
development host system and a i586-tuned target architecture
based off the SDK for core-image-sato:
poky-glibc-x86_64-core-image-sato-i586-toolchain-1.8.sh
Toolchains are self-contained and by default are installed into
/opt/poky.
However, when you run the toolchain installer, you can choose an
installation directory.
The following command shows how to run the installer given a toolchain tarball for a 64-bit x86 development host system and a 32-bit x86 target architecture. You must change the permissions on the toolchain installer script so that it is executable.
The example assumes the toolchain installer is located in ~/Downloads/.
Note
If you do not have write permissions for the directory into which you are installing the toolchain, the toolchain installer notifies you and exits. Be sure you have write permissions in the directory and run the installer again.
$ ~/Downloads/poky-glibc-x86_64-core-image-sato-i586-toolchain-1.8.sh
For more information on how to install tarballs, see the "Using a Cross-Toolchain Tarball" and "Using BitBake and the Build Directory" sections in the Yocto Project Application Developer's Guide.
Downloading the Pre-Built Linux Kernel
You can download the pre-built Linux kernel suitable for running in the QEMU emulator from
http://downloads.yoctoproject.org/releases/yocto/yocto-1.8/machines/qemu.
Be sure to use the kernel that matches the architecture you want to simulate.
Download areas exist for the five supported machine architectures:
qemuarm, qemumips, qemuppc,
qemux86, and qemux86-64.
Most kernel files have one of the following forms:
     *zImage-qemuarch.bin
     vmlinux-qemuarch.bin

     Where:
         arch is a string representing the target architecture:
                x86, x86-64, ppc, mips, or arm.
You can learn more about downloading a Yocto Project kernel in the "Yocto Project Kernel" bulleted item in the Yocto Project Development Manual.
Downloading the Filesystem
You can also download the filesystem image suitable for your target architecture from http://downloads.yoctoproject.org/releases/yocto/yocto-1.8/machines/qemu. Again, be sure to use the filesystem that matches the architecture you want to simulate.
The filesystem image has two tarball forms: ext3 and
tar.
You must use the ext3 form when booting an image using the
QEMU emulator.
The tar form can be flattened out in your host development system
and used for build purposes with the Yocto Project.
     core-image-profile-qemuarch.ext3
     core-image-profile-qemuarch.tar.bz2

     Where:
         profile is the filesystem image's profile:
                   lsb, lsb-dev, lsb-sdk, lsb-qt3, minimal, minimal-dev, sato,
                   sato-dev, or sato-sdk. For information on these types of image
                   profiles, see the "Images"
                   chapter in the Yocto Project Reference Manual.

         arch is a string representing the target architecture:
                x86, x86-64, ppc, mips, or arm.
Setting Up the Environment and Starting the QEMU Emulator
Before you start the QEMU emulator, you need to set up the emulation environment. The following command form sets up the emulation environment.
     $ source /opt/poky/1.8/environment-setup-arch-poky-linux-if

     Where:
         arch is a string representing the target architecture:
                i586, x86_64, ppc603e, mips, or armv5te.

         if is a string representing an embedded application binary interface.
              Not all setup scripts include this string.
Finally, this command form invokes the QEMU emulator
     $ runqemu qemuarch kernel-image filesystem-image

     Where:
         qemuarch is a string representing the target architecture: qemux86, qemux86-64,
                    qemuppc, qemumips, or qemuarm.

         kernel-image is the architecture-specific kernel image.

         filesystem-image is the .ext3 filesystem image.
Continuing with the example, the following two commands setup the emulation
environment and launch QEMU.
This example assumes the root filesystem (.ext3 file) and
the pre-built kernel image file both reside in your home directory.
The kernel and filesystem are for a 32-bit target architecture.
     $ cd $HOME
     $ source /opt/poky/1.8/environment-setup-i586-poky-linux
     $ runqemu qemux86 bzImage-qemux86.bin \
     core-image-sato-qemux86.ext3
The environment in which QEMU launches varies depending on the filesystem image and on the target architecture. For example, if you source the environment for the ARM target architecture and then boot the minimal QEMU image, the emulator comes up in a new shell in command-line mode. However, if you boot the SDK image, QEMU comes up with a GUI.
Note
Booting the PPC image results in QEMU launching in the same shell in command-line mode.
For more detailed information on using the Yocto Project for image and application develop, the best place to continue reading is in the Yocto Project Development Manual.
Super User 
This section [1] gives you a minimal description of how to use the Yocto Project to build images for Beaglebone hardware starting from scratch. The steps were performed on a 64-bit Ubuntu 12.04 system that has four cores.
Getting the Yocto Project
Set up your
Source Directory
by using Git to clone the poky
repository and then check out the release branch:
     $ cd ~
     $ git clone git://git.yoctoproject.org/poky
     $ cd poky
     $ git checkout -b fido origin/fido
Setting Up Your Host
You need some packages for everything to work. Rather than duplicate them here, look at the "The Packages" section earlier in this quick start.
Initializing the Build Environment
From the root directory of your Source Directory, initialize your environment and provide a meaningful Build Directory name:
$ source oe-init-build-env mybuilds
At this point, the mybuilds directory has
been created for you and it is now your current working directory.
If you do not provide your own directory name,
it defaults to build,
which is inside the Source Directory.
Configuring the local.conf File
Initializing the build environment creates a
conf/local.conf configuration file
in the Build Directory.
You need to manually edit this file to specify the machine you
are building:
MACHINE ?= "beaglebone"
A good deal that goes into a Yocto Project build is simply downloading all of the source tarballs. Steps exist that can help you be more efficient with gathering source files. For example, you can set up local mirrors that hold your source tarballs or you can pre-fetch all your source without initiating a build until later. For more information, see the "Working with Source Files" section in the Yocto Project Development Manual.
Building the Image
At this point, you need to select an image to build for the Beaglebone hardware. If this is your first build using the Yocto Project, you should try the smallest and simplest image:
$ bitbake core-image-minimal
Now you just wait for the build to finish.
By default, BitBake aborts when it encounters an error during the build. If you want to make sure the build continues even when BitBake encounters an error, use this variation:
$ bitbake -k core-image-minimal
Once you have your image, you can take steps to load and boot it on the target hardware.
You can learn about BitBake in general by reading the BitBake User Manual.
[1] Kudos and thanks to Robert P. J. Day of CrashCourse for providing the basis for this "expert" section with information from one of his wiki pages.