 |
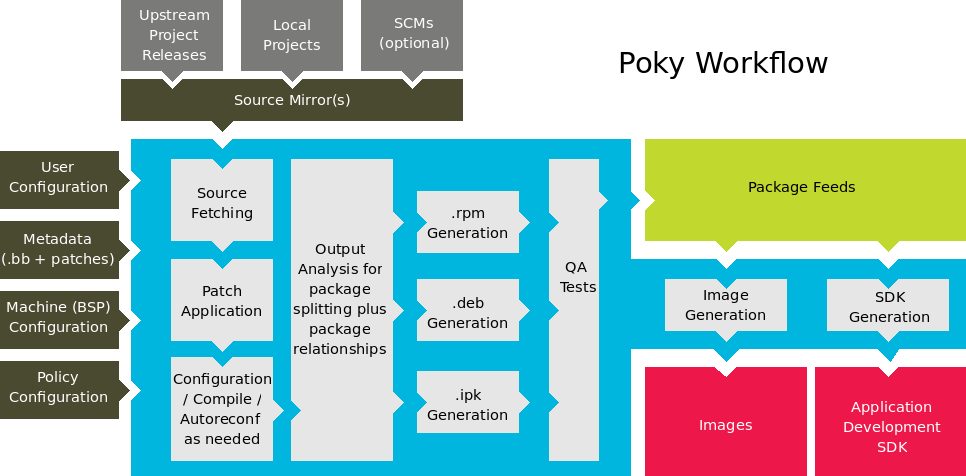
Welcome to the Yocto Project! The Yocto Project (YP) is an open-source collaboration project focused on embedded Linux developers. Amongst other things, YP uses the Poky build tool to construct complete Linux images.
This short document will give you some basic information about the environment as well as let you experience it in its simplest form. After reading this document you will have a basic understanding of what the Yocto Project is and how to use some of its core components. This document steps you through a simple example showing you how to build a small image and run it using the QEMU emulator.
For complete information on the Yocto Project you should check out the Yocto Project Website. You can find the latest builds, breaking news, full development documentation, and a rich Yocto Project Development Community into which you can tap.
The Yocto Project through the Poky build tool provides an open source development environment targeting the ARM, MIPS, PowerPC and x86 architectures for a variety of platforms including x86-64 and emulated ones. You can use components from the the Yocto Project to design, develop, build, debug, simulate, and test the complete software stack using Linux, the X Window System, GNOME Mobile-based application frameworks, and Qt frameworks.
 |
The Yocto Project Development Environment
Yocto Project:
Provides a recent Linux kernel along with a set of system commands and libraries suitable for the embedded environment.
Makes available system components such as X11, Matchbox, GTK+, Pimlico, Clutter, GuPNP and Qt (among others) so you can create a richer user interface experience on devices that use displays or have a GUI. For devices that don't have a GUI or display you simply would not employ these components.
Creates a focused and stable core compatible with the OpenEmbedded project with which you can easily and reliably build and develop.
Fully supports a wide range of hardware and device emulation through the QEMU Emulator.
Yocto Project can generate images for many kinds of devices. However, the standard example machines target QEMU full system emulation for x86, ARM, MIPS, and PPC based architectures as well as specific hardware such as the Intel Desktop Board DH55TC. Because an image developed with Yocto Project can boot inside a QEMU emulator, the development environment works nicely as a test platform for developing embedded software.
Another important Yocto Project feature is the Sato reference User Interface. This optional GNOME mobile-based UI, which is intended for devices with resolution but restricted size screens, sits neatly on top of a device using the GNOME Mobile Stack providing a well defined user experience. Implemented in its own layer, it makes it clear to developers how they can implement their own UIs on top of Yocto Linux.
You need these things to develop in the Yocto Project environment:
A host system running a supported Linux distribution (i.e. recent releases of Fedora, OpenSUSE, Debian, and Ubuntu).
The right packages.
A release of Yocto Project.
This document assumes you are running a reasonably current Linux-based host system. The examples work for both Debian-based and RPM-based distributions.
The packages you need for a Debian-based host are shown in the following command:
     $ sudo apt-get install sed wget cvs subversion git-core coreutils \
     unzip texi2html texinfo libsdl1.2-dev docbook-utils gawk \
     python-pysqlite2 diffstat help2man make gcc build-essential \
     g++ desktop-file-utils chrpath libgl1-mesa-dev libglu1-mesa-dev \
     mercurial
The packages you need for an RPM-based host like Fedora are shown in these commands:
     $ sudo yum groupinstall "development tools"
     $ sudo yum install python m4 make wget curl ftp hg tar bzip2 gzip \
     unzip python-psyco perl texinfo texi2html diffstat openjade \
     docbook-style-dsssl sed docbook-style-xsl docbook-dtds \
     docbook-utils sed bc glibc-devel ccache pcre pcre-devel quilt \
     groff linuxdoc-tools patch linuxdoc-tools cmake help2man \
     perl-ExtUtils-MakeMaker tcl-devel gettext chrpath ncurses apr \
     SDL-devel mesa-libGL-devel mesa-libGLU-devel
NOTE: Packages vary in number and name for other Linux distributions. The commands here should work. We are interested, though, to learn what works for you. You can find more information for package requirements on common Linux distributions at http://wiki.openembedded.net/index.php/OEandYourDistro. However, you should be careful when using this information as the information applies to old Linux distributions that are known to not work with a current Poky install.
The latest release images for the Yocto Project are kept at http://yoctoproject.org/downloads/yoctolinux-0.9/. Nightly and developmental builds are also maintained. However, for this document a released version of Yocto Project is used.
Now that you have your system requirements in order you can give Yocto Project a try. This section presents some steps that let you do the following:
Build an image and run it in the emulator
Or, use a pre-built image and run it in the emulator
In the development environment you will need to build an image whenever you change hardware support, add or change system libraries, or add or change services that have dependencies.

Building an Image
Use the following commands from a shell on your Debian-based host to build your image. The build creates an entire Linux system including the Toolchain from the source.
NOTE: The build process using Sato currently consumes 50GB of disk space. To allow for variations in the build process and for future package expansion we recommend 100GB of free disk space.
     $ wget http://www.yoctoproject.org/downloads/poky/poky-laverne-4.0.tar.bz2
     $ tar xjf poky-laverne-4.0.tar.bz2
     $ source poky-4.0/poky-init-build-env poky-4.0-build
The first two commands extract the Yocto Project files from the release area and place them into a subdirectory of your current directory (poky-4.0-build in this example).
The $ source command creates the directory and places you there. The build directory contains all the object files used during the build. The default build directory is poky-4.0-build. Note that you can change the target architecture by editing the <build_directory>/conf/local.conf file. By default the target architecture is qemux86.
Now might be a good time to edit the conf/local.conf file. The defaults should all be fine. However, you might want to look at the variables BB_NUMBER_THREADS and PARALLEL_MAKE. By default, these variables are commented out.
Continue with the following command to build the OS image for the target, which is poky-image-sato in this example.
$ bitbake poky-image-sato
NOTE: If you are running Fedora 14 or another distribution with GNU make 3.82 you might have to run the following two $bitbake commands instead:
     $ bitbake make-native
     $ bitbake poky-image-sato
The final command runs the image:
$ poky-qemu qemux86
The build process could take several hours the first time you run it. Depending on the number of processor and cores, the amount or RAM, the speed of your internet connection and other factors. After the initial build, subsequent builds run much faster.
If hardware, libraries and services are stable you can use a pre-built image of the image, kernel and toolchain and just run it on the target using the emulator QEMU. This situation is perfect for developing application software.

Using a Pre-Built Image
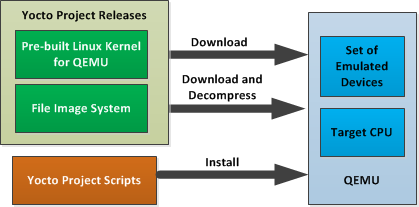
For this scenario you need to do three things:
Install the standalone Yocto toolchain tarball
Download the pre-built kernel that will run on QEMU. You need to be sure to get the QEMU image that matches your target machine’s architecture (e.g. x86, ARM, etc.).
Download and decompress the file image system.
You can download the pre-built toolchain which includes the poky-qemu script and support files from http://yoctoproject.org/downloads/yoctolinux-0.9/toolchain/. These are available for i586 (32-bit) and x86_64 (64 bit) host machines, targeting each of the 5 supported target architectures. The tarballs are self contained and install into /opt/poky. Use these commands to install the toolchain tarball (taking the 64 bit host, 32 bit i586 target as an example):
     $ cd /
     $ sudo tar -xvjf yoctolinux-eglibc-x86_64-i586-toolchain-sdk-0.9.tar.bz2
You can download the pre-built Linux kernel and the file image system from http://yoctoproject.org/downloads/yoctolinux-0.9/. The kernel and file image system have the following forms, respectively:
     *zImage*qemu*.bin
     poky-image-*-qemu*.ext2.bz2
You must decompress the file image system using the following command:
$ bzip2 -d
You can now start the emulator using these commands (assuming an 32 bit i586 target):
     $ source /opt/poky/environment-setup-i586-poky-linux
     $ poky-qemu <kernel> <image>