Yocto Project Quick Start
Copyright © 2010-2015 Linux Foundation
Permission is granted to copy, distribute and/or modify this document under the terms of the Creative Commons Attribution-Share Alike 2.0 UK: England & Wales as published by Creative Commons.
Note
For the latest version of this manual associated with this Yocto Project release, see the Yocto Project Quick Start from the Yocto Project website.Welcome!
Welcome to the Yocto Project! The Yocto Project is an open-source collaboration project whose focus is developers of embedded Linux systems. Among other things, the Yocto Project uses a build host based on the OpenEmbedded (OE) project, which uses the BitBake tool, to construct complete Linux images. The BitBake and OE components are combined together to form a reference build host, historically known as Poky.
If you do not have a system that runs Linux and you want to give the Yocto Project a test run, you might consider using the Yocto Project Build Appliance. The Build Appliance allows you to build and boot a custom embedded Linux image with the Yocto Project using a non-Linux development system. See the Yocto Project Build Appliance for more information.
This quick start is written so that you can quickly get a host build host set up to use the Yocto Project and then build some Linux images. Rather than go into great detail about the Yocto Project and its many capabilities, this quick start provides the minimal information you need to try out the Yocto Project using a supported Linux build host. Reading and using the quick start should result in you having a basic understanding of what the Yocto Project is and how to use some of its core components. You will also have worked through steps to produce two images: one suitable for emulation and one that can be used on actual hardware. The examples highlight the ease with which you can use the Yocto Project to create images for multiple types of hardware.
For more detailed information on the Yocto Project, you can reference these resources:
Website: The Yocto Project Website provides the latest builds, breaking news, full development documentation, and access to a rich Yocto Project Development Community into which you can tap.
FAQs: Lists commonly asked Yocto Project questions and answers. You can find two FAQs: Yocto Project FAQ on a wiki, and the "FAQ" chapter in the Yocto Project Reference Manual.
Developer Screencast: The Getting Started with the Yocto Project - New Developer Screencast Tutorial provides a 30-minute video created for users unfamiliar with the Yocto Project but familiar with Linux build hosts. While this screencast is somewhat dated, the introductory and fundamental concepts are useful for the beginner.
Introducing the Yocto Project Development Environment
The Yocto Project through the OpenEmbedded build system provides an open source development environment targeting the ARM, MIPS, PowerPC, and x86 architectures for a variety of platforms including x86-64 and emulated ones. You can use components from the Yocto Project to design, develop, build, debug, simulate, and test the complete software stack using Linux, the X Window System, GTK+ frameworks, and Qt frameworks.
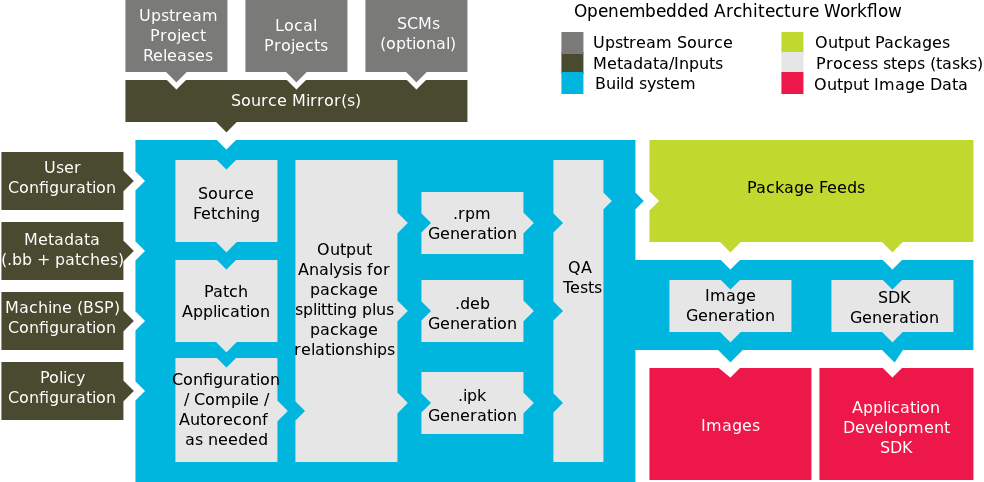 |
The Yocto Project Development Environment
Here are some highlights for the Yocto Project:
Provides a recent Linux kernel along with a set of system commands and libraries suitable for the embedded environment.
Makes available system components such as X11, GTK+, Qt, Clutter, and SDL (among others) so you can create a rich user experience on devices that have display hardware. For devices that do not have a display or where you wish to use alternative UI frameworks, these components need not be installed.
Creates a focused and stable core compatible with the OpenEmbedded project with which you can easily and reliably build and develop.
Fully supports a wide range of hardware and device emulation through the Quick EMUlator (QEMU).
Provides a layer mechanism that allows you to easily extend the system, make customizations, and keep them organized.
You can use the Yocto Project to generate images for many kinds of devices. As mentioned earlier, the Yocto Project supports creation of reference images that you can boot within and emulate using QEMU. The standard example machines target QEMU full-system emulation for 32-bit and 64-bit variants of x86, ARM, MIPS, and PowerPC architectures. Beyond emulation, you can use the layer mechanism to extend support to just about any platform that Linux can run on and that a toolchain can target.
Another Yocto Project feature is the Sato reference User Interface. This optional UI that is based on GTK+ is intended for devices with restricted screen sizes and is included as part of the OpenEmbedded Core layer so that developers can test parts of the software stack.
Setting Up to Use the Yocto Project
The following list shows what you need in order to use a Linux-based build host to use the Yocto Project to build images:
Build Host A build host with a minimum of 50 Gbytes of free disk space that is running a supported Linux distribution (i.e. recent releases of Fedora, openSUSE, CentOS, Debian, or Ubuntu).
Build Host Packages Appropriate packages installed on the build host.
The Yocto Project A release of the Yocto Project.
The Linux Distribution
The Yocto Project team verifies each release against recent versions of the most popular Linux distributions that provide stable releases. In general, if you have the current release minus one of the following distributions, you should have no problems.
Ubuntu
Fedora
openSUSE
CentOS
Debian
For a more detailed list of distributions that support the Yocto Project, see the "Supported Linux Distributions" section in the Yocto Project Reference Manual.
The OpenEmbedded build system should be able to run on any modern distribution that has the following versions for Git, tar, and Python.
Git 1.7.8 or greater
tar 1.24 or greater
Python 2.7.3 or greater excluding Python 3.x, which is not supported.
If your build host does not meet any of these three listed version requirements, you can take steps to prepare the system so that you can still use the Yocto Project. See the "Required Git, tar, and Python Versions" section in the Yocto Project Reference Manual for information.
The Build Host Packages
Required build host packages vary depending on your build machine and what you want to do with the Yocto Project. For example, if you want to build an image that can run on QEMU in graphical mode (a minimal, basic build requirement), then the build host package requirements are different than if you want to build an image on a headless system or build out the Yocto Project documentation set.
Collectively, the number of required packages is large if you want to be able to cover all cases.
Note
In general, you need to have root access and then install the required packages. Thus, the commands in the following section may or may not work depending on whether or not your Linux distribution hassudo installed.
The following list shows the required packages needed to build an image that runs on QEMU in graphical mode (e.g. essential plus graphics support). For lists of required packages for other scenarios, see the "Required Packages for the Host Development System" section in the Yocto Project Reference Manual.
Ubuntu and Debian
     $ sudo apt-get install gawk wget git-core diffstat unzip texinfo gcc-multilib \
     build-essential chrpath socat libsdl1.2-dev xterm
Fedora
     $ sudo dnf install gawk make wget tar bzip2 gzip python unzip perl patch \
     diffutils diffstat git cpp gcc gcc-c++ glibc-devel texinfo chrpath \
     ccache perl-Data-Dumper perl-Text-ParseWords perl-Thread-Queue socat \
     findutils which SDL-devel xterm
OpenSUSE
     $ sudo zypper install python gcc gcc-c++ git chrpath make wget python-xml \
     diffstat makeinfo python-curses patch socat libSDL-devel xterm
CentOS
     $ sudo yum install gawk make wget tar bzip2 gzip python unzip perl patch \
     diffutils diffstat git cpp gcc gcc-c++ glibc-devel texinfo chrpath socat \
     perl-Data-Dumper perl-Text-ParseWords perl-Thread-Queue SDL-devel xterm
Note
CentOS 6.x users need to ensure that the required versions of Git, tar and Python are available. For details, See the "Required Git, tar, and Python Versions" section in the Yocto Project Reference Manual for information.
Yocto Project Release
The last requirement you need to meet before using the
Yocto Project is getting a Yocto Project release.
It is recommended that you get the latest Yocto Project release
by setting up (cloning in
Git terms) a
local copy of the poky Git repository on
your build host and then checking out the latest release.
Doing so allows you to easily update to newer Yocto Project
releases as well as contribute back to the Yocto Project.
Here is an example from an Ubuntu build host that clones the
poky repository and then checks out the
latest Yocto Project Release (i.e. 2.0):
     $ git clone git://git.yoctoproject.org/poky
     Cloning into 'poky'...
     remote: Counting objects: 226790, done.
     remote: Compressing objects: 100% (57465/57465), done.
     remote: Total 226790 (delta 165212), reused 225887 (delta 164327)
     Receiving objects: 100% (226790/226790), 100.98 MiB | 263 KiB/s, done.
     Resolving deltas: 100% (165212/165212), done.
     $ git checkout jethro
You can also get the Yocto Project Files by downloading Yocto Project releases from the Yocto Project website.
For more information on getting set up with the Yocto Project release, see the "Yocto Project Release" item in the Yocto Project Development Manual.
Building Images
Now that you have your system requirements in order, you can give the Yocto Project a try. This section presents steps that let you do the following:
Build a
qemux86reference image and run it in the QEMU emulator.Easily change configurations so that you can quickly create a second image, which would be for MinnowBoard MAX-compatible boards.
Note
The steps in this section do not provide detail, but rather provide minimal, working commands and examples designed to just get you started. For more details, see the appropriate manuals in the Yocto Project manual set.
Use the following commands to build your image. The OpenEmbedded build system creates an entire Linux distribution, including the toolchain, from source.
Note about Network Proxies
By default, the build process searches for source code using a pre-determined order through a set of locations. If you are working behind a firewall and your build host is not set up for proxies, you could encounter problems with the build process when fetching source code (e.g. fetcher failures or Git failures).
If you do not know your proxy settings, consult your local network infrastructure resources and get that information. A good starting point could also be to check your web browser settings. Finally, you can find more information on using the Yocto Project behind a firewall in the Yocto Project Reference Manual FAQ and on the "Working Behind a Network Proxy" wiki page.
Be Sure Your Build Host is Set Up: The steps to build an image in this section depend on your build host being properly set up. Be sure you have worked through the requirements described in the "Setting Up to Use the Yocto Project" section.
Check Out Your Branch: Be sure you are in the Source Directory (e.g.
poky) and then check out the branch associated with the latest Yocto Project Release:$ cd ~/poky $ git checkout -b jethro origin/jethroGit's
checkoutcommand checks out the current Yocto Project release into a local branch whose name matches the release (i.e.jethro). The local branch tracks the upstream branch of the same name. Creating your own branch based on the released branch ensures you are using the latest files for that release.Initialize the Build Environment: Run the
oe-init-build-envenvironment setup script to define the OpenEmbedded build environment on your build host.$ source oe-init-build-envAmong other things, the script creates the Build Directory, which is
buildin this case and is located in the Source Directory. After the script runs, your current working directory is set to the Build Directory. Later, when the build completes, the Build Directory contains all the files created during the build.Note
For information on running a memory-resident BitBake, see theoe-init-build-env-memressetup script.Examine Your Local Configuration File: When you set up the build environment, a local configuration file named
local.confbecomes available in aconfsubdirectory of the Build Directory. Before using BitBake to start the build, you can look at this file and be sure your general configurations are how you want them:To help conserve disk space during builds, you can add the following statement to your project's configuration file, which for this example is
poky/build/conf/local.conf. Adding this statement deletes the work directory used for building a recipe once the recipe is built.INHERIT += "rm_work"By default, the target machine for the build is
qemux86, which produces an image that can be used in the QEMU emulator and is targeted at an Intel® 32-bit based architecture. Further on in this example, this default is easily changed through theMACHINEvariable so that you can quickly build an image for a different machine.Another consideration before you build is the package manager used when creating the image. The default
local.conffile selects the RPM package manager. You can control this configuration by using thePACKAGE_CLASSESSelection of the package manager is separate from whether package management is used at runtime in the target image.
For additional package manager selection information, see the "
package*.bbclass" section in the Yocto Project Reference Manual.
Start the Build: Continue with the following command to build an OS image for the target, which is
core-image-satoin this example:Note
Depending on the number of processors and cores, the amount of RAM, the speed of your Internet connection and other factors, the build process could take several hours the first time you run it. Subsequent builds run much faster since parts of the build are cached.$ bitbake core-image-satoFor information on using the
bitbakecommand, see the "BitBake" section in the Yocto Project Reference Manual, or see the "BitBake Command" section in the BitBake User Manual. For information on other targets, see the "Images" chapter in the Yocto Project Reference Manual.Simulate Your Image Using QEMU: Once this particular image is built, you can start QEMU and run the image:
$ runqemu qemux86If you want to learn more about running QEMU, see the "Using the Quick EMUlator (QEMU)" chapter in the Yocto Project Development Manual.
Exit QEMU: Exit QEMU by either clicking on the shutdown icon or by opening a terminal, typing
poweroff, and then pressing "Enter".
The following steps show how easy it is to set up to build an
image for a new machine.
These steps build an image for the MinnowBoard MAX, which is
supported by the Yocto Project and the
meta-intel intel-corei7-64
and intel-core2-32 Board Support Packages
(BSPs).
Note
The MinnowBoard MAX ships with 64-bit firmware. If you want to use the board in 32-bit mode, you must download the 32-bit firmware.
Create a Local Copy of the
meta-intelRepository: Building an image for the MinnowBoard MAX requires themeta-intellayer. Use thegit clonecommand to create a local copy of the repository:$ git clone git://git.yoctoproject.org/meta-intel Cloning into 'meta-intel'... remote: Counting objects: 10824, done. remote: Compressing objects: 100% (3508/3508), done. remote: Total 10824 (delta 6219), reused 10580 (delta 5975) Receiving objects: 100% (10824/10824), 2.72 MiB | 482.00 KiB/s, done. Resolving deltas: 100% (6219/6219), done. Checking connectivity... done.Configure the Build: To configure the build, you edit the
bblayers.confandlocal.conffiles, both of which are located in thebuild/confdirectory.Here is a quick way to make the edits. The first command uses the
bitbake-layers add-layercommand to add themeta-intellayer, which contains theintel-core*BSPs to the build. The second command selects the BSP by setting theMACHINEvariable.$ bitbake-layers add-layer "$HOME/source/poky/meta-intel" $ echo 'MACHINE = "intel-corei7-64"' >> conf/local.confNotes
If you want a 64-bit build, use the following:
$ echo 'MACHINE = "intel-corei7-64"' >> conf/local.confIf you want 32-bit images, use the following:
$ echo 'MACHINE = "intel-core2-32"' >> conf/local.confBuild a Minimal Image for MinnowBoard MAX: Use the following command to build the minimal image for MinnowBoard MAX. Because configuration changes are minimal to set up for this second build, the OpenEmbedded build system can re-use files from previous builds as much as possible. Re-using files means this second build will be much faster than an initial build.
$ bitbake core-image-minimalOnce the build completes, the resulting basic console image is located in the Build Directory here:
tmp/deploy/images/intel-corei7-64/core-image-minimal-intel-corei7-64.hddimgWrite the Image: You can write the image to a USB key, SATA drive, or SD card by using the
mkefidisk.shscript, which is included in thepokyrepository atscripts/contrib/mkefidisk.sh:$ sudo $HOME/source/poky/scripts/contrib/mkefidisk.shHOST_DEVICE\ tmp/deploy/images/intel-corei7-64/core-image-minimal-intel-corei7-64.hddimgTARGET_DEVICEIn the previous command,
HOST_DEVICEis the device node on the build host (e.g./dev/sdcor/dev/mmcblk0).TARGET_DEVICEis the name of the device as the MinnowBoard MAX sees it (e.g./dev/sdaor/dev/mmcblk0).Boot the Hardware: With the boot device provisioned, you can insert the media into the MinnowBoard MAX and boot the hardware. The board should automatically detect the media and boot to the bootloader and subsequently the operating system.
If the board does not boot automatically, you can boot it manually from the EFI shell as follows:
     Shell> connect -r
     Shell> map -r
     Shell> fs0:
     Shell> bootx64
Note
For a 32-bit image use the following:Shell> bootia32
Next Steps
If you completed all the steps in the previous section then congratulations to you! What now?
Depending on what you primary interests are with the Yocto Project, you could consider any of the following:
Visit the Yocto Project Web Site: The official Yocto Project web site contains information on the entire project. Visiting this site is a good way to familiarize yourself with the overall project.
Explore Development Models: You can see the "Common Development Models" section in the Yocto Project Development Manual to get an overview of the various ways by which you can use the Yocto Project to develop projects.
Learn Some Open Source Basics: If you are new to the open source environment, you might read the "The Yocto Project Open Source Development Environment" chapter of the Yocto Project Development Manual. This chapter presents overview material for open source development in the context of the Yocto Project.
Learn About Application Development: If your primary interests lie in developing applications, you can reference the Yocto Project Application Developer's Guide.
Learn About Board Support Packages (BSPs): If you want to learn about BSPs, see the Yocto Project Board Support Packages (BSP) Developer's Guide.
Learn About Using Eclipse With the Yocto Project: If you are an Eclipse user, you can learn about using the Yocto Project in that development environment by reading the "Workflow Using the ADT and Eclipse™" section in the Yocto Project Development Manual.
Learn About Toaster: Toaster is a web interface to the Yocto Project's OpenEmbedded build system. If you are interested in using this type of interface to create images, see the Toaster User Manual.
Explore Yocto Project Common Tasks and Technical Details: If you are interested in a mix of common tasks that have to do with project develop using the Yocto Project, see the "Common Tasks" section of the Yocto Project Development Manual. If you want more detail, see the Yocto Project Reference Manual.